MLflow comes with a rich CLI that provides a simple interface to various functionality in MLflow. You can use the CLI to run projects, start the tracking UI, create and list experiments, download run artifacts, serve MLflow Python Function and scikit-learn models, and serve models on Microsoft Azure Machine Learning and Amazon SageMaker.
!mlflow --help
Usage: mlflow [OPTIONS] COMMAND [ARGS]...

Options:
  --version  Show the version and exit.
  --help     Show this message and exit.

Commands:
  artifacts    Upload, list, and download artifacts from an MLflow...
  azureml      Serve models on Azure ML.
  db           Commands for managing an MLflow tracking database.
  deployments  Deploy MLflow models to custom targets.
  experiments  Manage experiments.
  gc           Permanently delete runs in the `deleted` lifecycle stage.
  models       Deploy MLflow models locally.
  pipelines    Run MLflow Pipelines and inspect pipeline results.
  run          Run an MLflow project from the given URI.
  runs         Manage runs.
  sagemaker    Serve models on SageMaker.
  server       Run the MLflow tracking server.
  ui           Launch the MLflow tracking UI for local viewing of run...
In the next section, we will use mlflow server <args> and mlflow ui commands to demonstrate different MLflow set up scenarios.
Common MLflow configurations
Since the MLflow client can interface with a variety of backend and artifact storage configurations. We will look a three common scenarios:
Scenario#1
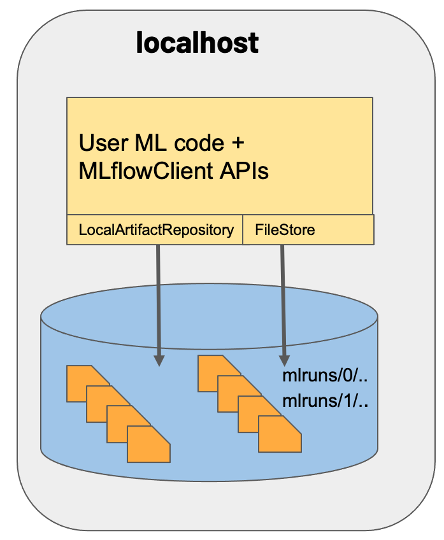
MLflow on localhost
This is the most basic set up, where both backend and artifact store are set to local file store. It’s the default mode, so we don’t have to set any parameters while starting the tracking server.
Start MLflow tracking server without any arguments as follows:
mlflow server
Scenario#2
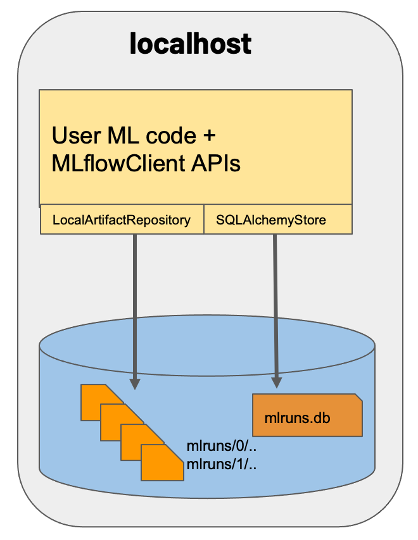
MLflow on localhost with backend store as an SQLAlchemy compatible database type: SQLite
In this case, artifacts are stored under a local directory, and MLflow entities are inserted in a SQLite database file mlruns.db.
Start MLflow tracking server by specifying appropriate values for --backend-store-uri and --default-artifact-root as follows:
mlflow server --backend-store-uri sqlite:////workspace/mlruns.db \--default-artifact-root /workspace/mlruns
Scenario#3
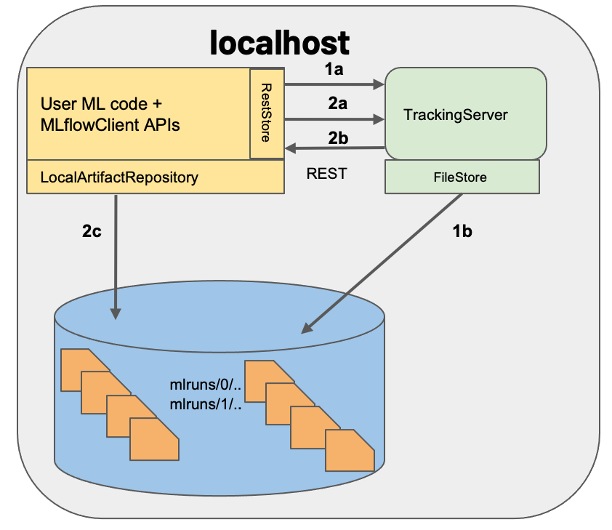
Tracking server launched at localhost
Similar to scenario 1 but a tracking server is launched, listening for REST request calls at the default port 5000.
Start MLflow tracking server by specifying local file path value for --backend-store-uri as follows:
mlflow server --backend-store-uri /workspace/mlruns
To make the CLI commands aware of the tracking server set the MLFLOW_TRACKING_URI environment variable as follows:
exportMLFLOW_TRACKING_URI="http://localhost:5000"
MLflow Tracking UI
After the tracking server is up using the scenario of choice, you can launch MLflow tracking UI by typing http://localhost:5000 in the browser.
MLFlow Tracking UI is in constant communication with the tracking server to present the results of each experiment from the set storage location. The UI contains the following key features:
Experiment-based run listing and comparison (including run comparison across multiple experiments)